Free Local SEO Grid Rank Tracker: Download & Full Setup Guide

Written by
Rich Voller
Senior SEO specialist and digital marketing strategist with over 20 years’ experience helping businesses grow through search. Rich focuses on bridging the gap between AI, data, and real-world SEO performance. Building practical systems, tools, and frameworks that turn complex data into clear, actionable insights.
We built a Local SEO grid rank tracker. Why? Mainly because the external service we were using did not really fit how our own internal systems worked. Essentially, no API’s.
So, naturally, the answer was to build our own. Fair enough?
The version we use internally sits inside our own proprietary toolkit.
This public version I am sharing is stripped back to the useful bit for everyone else: run a local ranking grid, see where you show up, and understand how visibility changes across an area.
No sign-up.
No email capture.
No "book a demo" nonsense.
Just the GitHub repo and this setup guide.
Why Singular Local Rankings Are Not One Number
Local SEO reports can be dangerously tidy.
You put in a keyword, choose a location, get a ranking position, and everyone pretends that is the answer.
It isn't.
Local rankings change across a city, town, postcode, or service area. You can rank well near your office and disappear a few miles down the road. You can look strong in one part of the map and get absolutely battered in another.
A single local ranking is like checking the weather by looking out of one window.
Useful, but incomplete.
A local rank grid gives you the wider view. Instead of asking "where do I rank?", it asks:
Where do I rank near my business?
Where do I drop off?
Which competitors are stronger in different areas?
Where should I focus my local SEO work next?
That is much more useful.
What This Tool Does
The tool creates a grid around a location and checks local rankings across each point on that grid.
In plain English, it lets you see how visible a business is across a local area rather than relying on one ranking position and hoping for the best.
![]()
The free public version we are sharing lets you:
- Create grids from 3x3 up to 15x15
- Adjust the distance between grid points
- Track local rankings across different areas
- See competitor performance across the same grid
That is the core of it.
It is not trying to be an enterprise local SEO platform. It is not trying to replace every paid tool in your stack. It does one job, and it does it in a way you can run, inspect, fork, adapt, or complain about on github or socials.
That last bit is important. Apparently people enjoy doing that.
Who This Is For
This is useful if you work in local SEO, run a local business, or manage SEO for businesses where location genuinely affects visibility.
Three examples:
1. A dentist
They can rank well within a mile of the practice, but not show up across the other side of town. A single rank check misses that. A grid makes it obvious.
2. A trades business
A plumber, roofer, electrician, or locksmith can have very different visibility across a service area. If the business wants leads from multiple towns, one central ranking is not enough.
3. An agency
If you are explaining local SEO performance to a client, a grid view is easier to understand than a spreadsheet full of positions. It turns ranking data into a map.
That is the point.
Local visibility is geographical. So the reporting should be geographical too.
What You Need Before You Start
You need three things:
- A Supabase project (Free is fine)
- A DataForSEO account and API key
- Google APIs API Key (Free)
Don't worry, if you are new to all of this then I explain everything below exactly
Supabase is used for the database side of things. Their Free plan is enough for testing this, and their own billing docs say the Free plan includes two free projects. Still, check your own usage because free tiers are free until they are not, which is a thrilling little game the internet likes to play.
DataForSEO provides the SERP data.
At the time of writing, DataForSEO says new accounts receive $1 of free trial credit for API testing. Their Google Maps SERP API pricing currently lists the Standard Queue at $0.0006 per SERP page, which works out at roughly $0.60 per 1,000 checks before any optional parameters or different priority modes.
Check their pricing before running anything huge.
Not because I am trying to scare you. Because surprises are only fun at birthdays, and even then it depends who organised it.
Useful references:
DataForSEO Google Maps SERP API pricing
DataForSEO free trial explanation
Supabase billing docs
Setup Video Tutorial
While you will still need to grab the contents for the .env.local file which is shared lower down in the article, if you would rather watch a video for the setup of the software then I have made a setup from scratch video.
Get the GitHub Repo
First, grab the repo. You can either fork it to your Github or download to your local machine. I am working through this tutorial with the later.
Note, I am working on a Mac, it will still work on a Windows machine, but some commands may be different.
For me personally, I prefer to work in an IDE. Windsurf and Cursor are my preferred platforms but you do you.
I am going to assume you have git & node JS installed on your computer.
If you don't, open terminal and run these two commands:
xcode-select --install
then
brew install git node
Now that they are installed (xcode is Apples command line tools). Git for Github and Node is NodeJS, a prerequist for this software to work locally.
Okay, onward....
Download the repo to your local computer (either download the Zip from Github or simply run the following command in your IDE Terminal:
git clone https://github.com/richvoller/grid-shared.gitNow, you need to ensure your terminal is working in the correct directory.
It all depends on how you organise your computer. For this example I will install it in a folder on my desktop named 'software'.
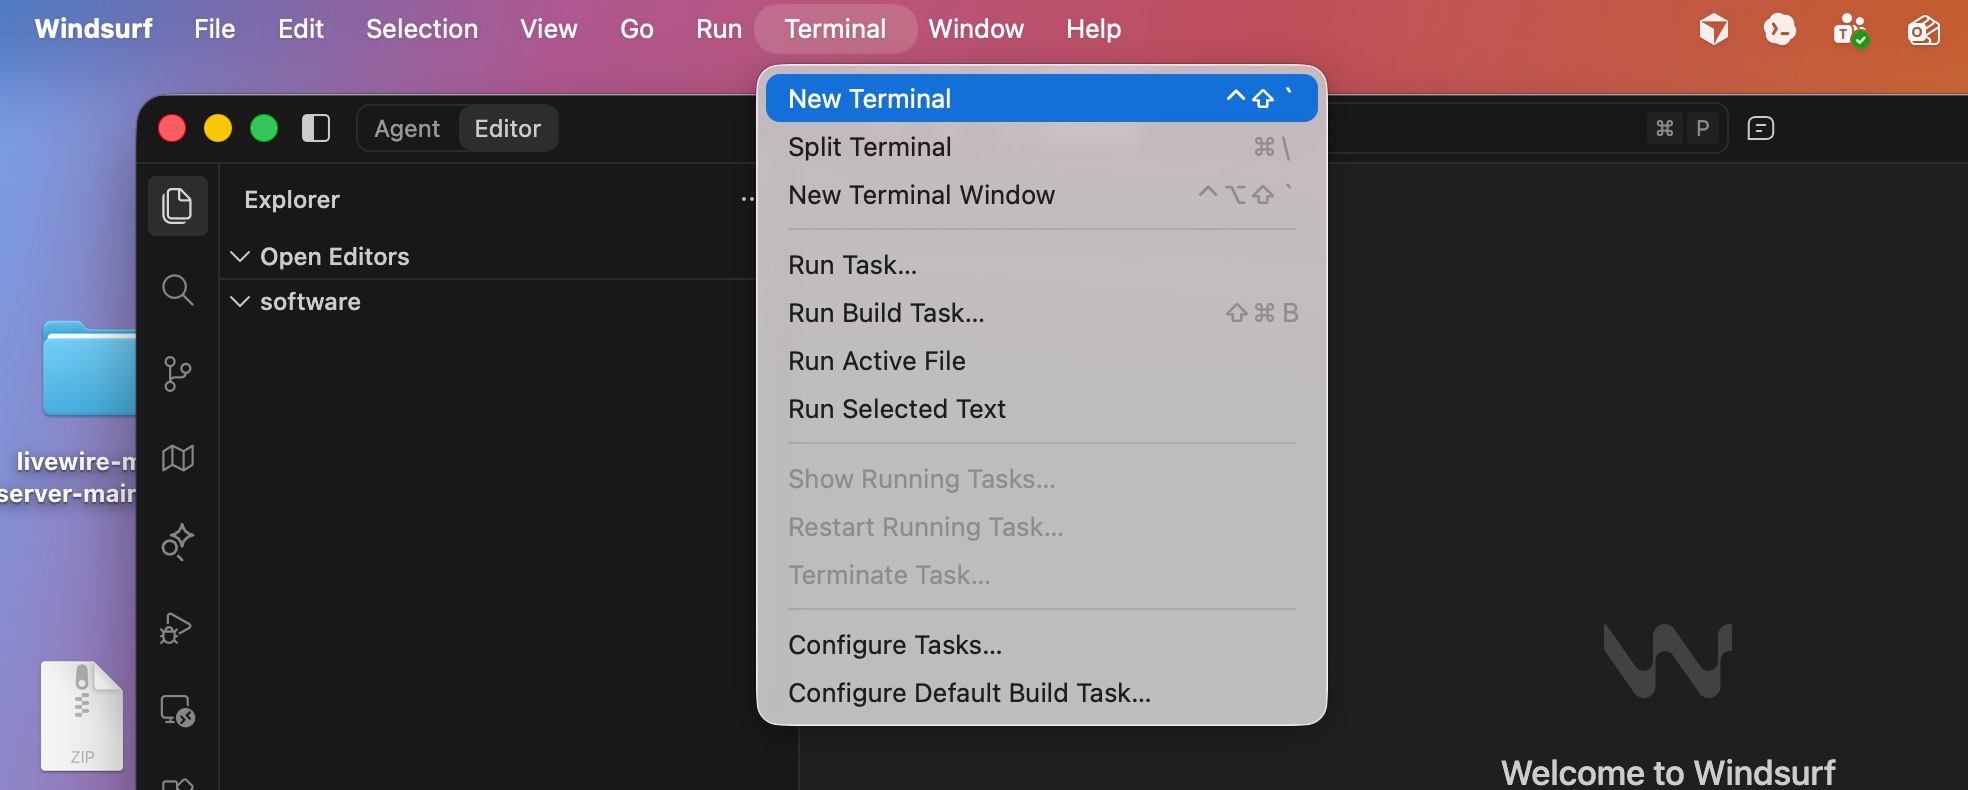
First of all, I will now jump to using my IDE (windsurf in this case), you can use whatever you like, VS Code, Cursor even Claude Code or Codex.
Then I will open the folder (directory) inside the IDE.
Now, in the IDE, you will see an empty folder.
Simply open a terminal in the IDE (like shown in the screenshot below.)
Now, your terminal session will automatically be in the 'software directory' (the folder on your desktop).
From there in terminal run the following command:
git clone https://github.com/richvoller/grid-shared.gitThat command will pull down the codebase from GitHub.
If it ran successfully you will will see something like this in terminal:
richvoller@Mac software % git clone https://github.com/richvoller/grid-shared.git
Cloning into 'grid-shared'...
remote: Enumerating objects: 116, done.
remote: Counting objects: 100% (116/116), done.
remote: Compressing objects: 100% (84/84), done.
remote: Total 116 (delta 14), reused 116 (delta 14), pack-reused 0 (from 0)
Receiving objects: 100% (116/116), 175.98 KiB | 8.00 MiB/s, done.
Resolving deltas: 100% (14/14), done.
richvoller@Mac software %
Now that you have the software sitting inside your software folder, we need to move terminal to be active inside of the same folder as the codebase.
To do this, in terminal simply type this:
cd grid-sharedOkay, no that terminal is in the correct directory, there is one last command to run which will install everything that is needed for this particular program to run. Type type in terminal:
npm installIf everything completed as expected everything should be installed.
You may well see packages have vulnerabilities, you can run 'npm audit fix' to update those which have updates but either way it shouldn't stop anything working on this.
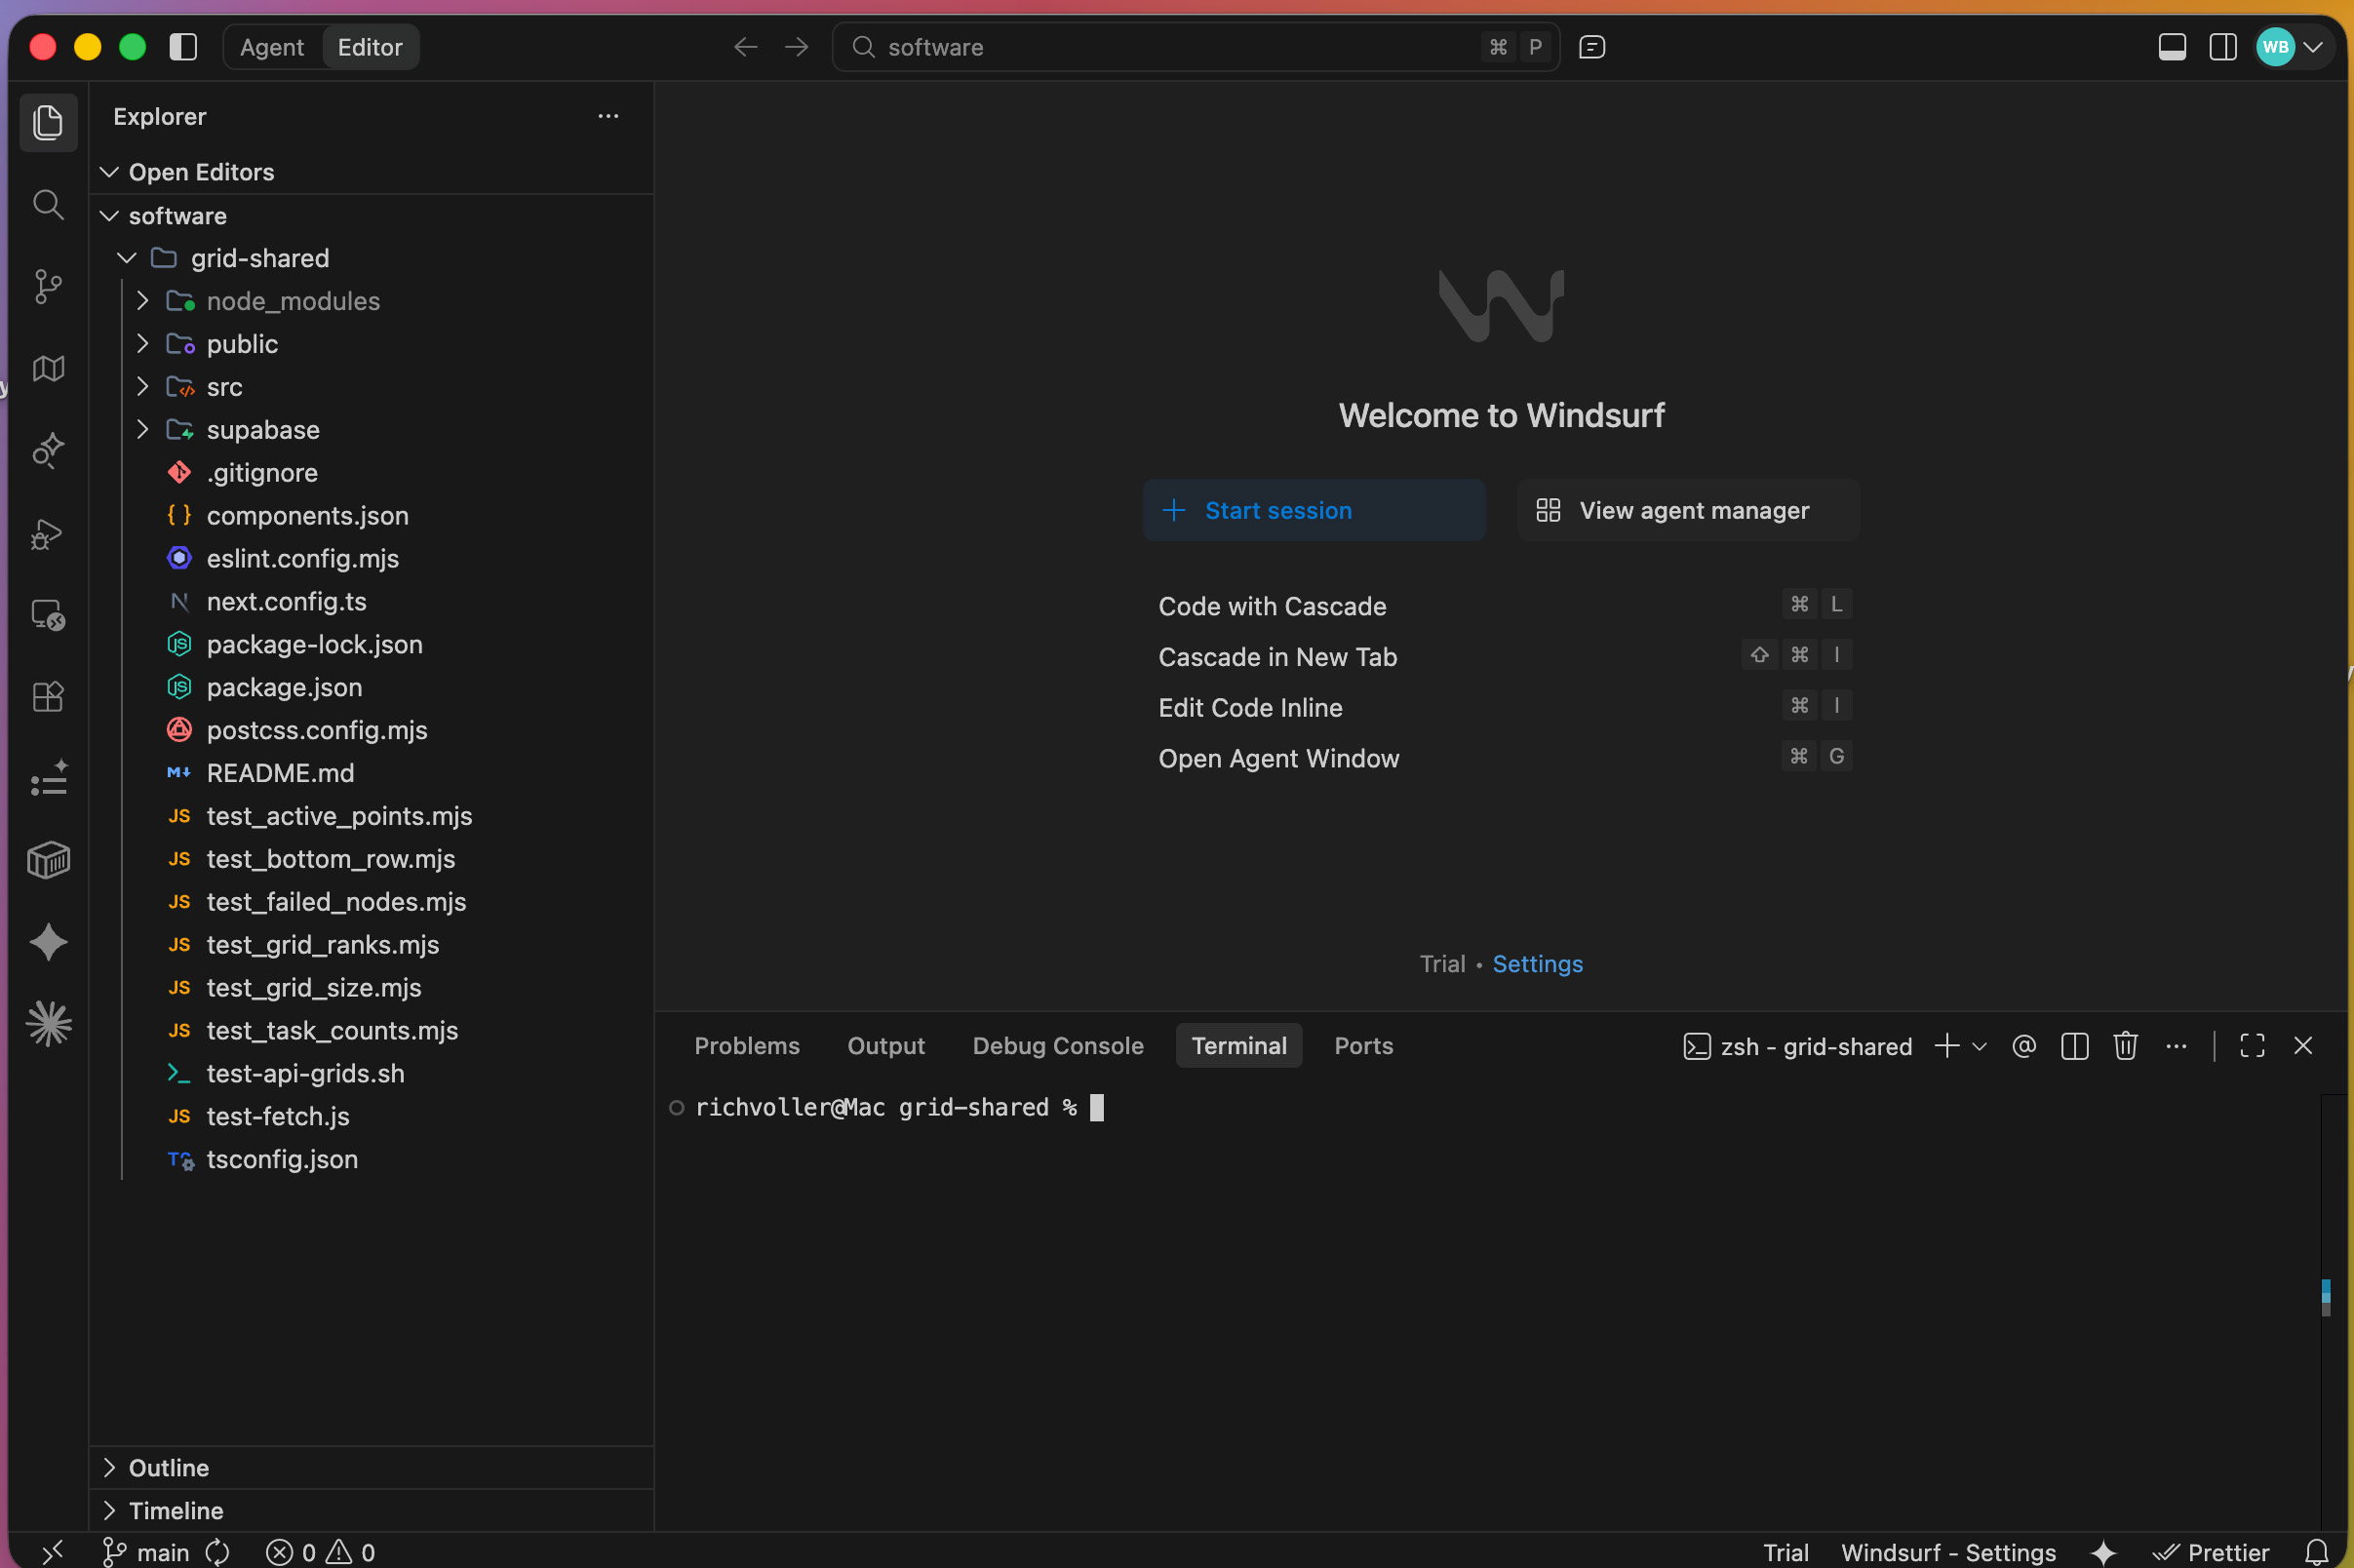
Now, if you click the folder 'grid-shared' in the sidebar you will see something like this:
Okay, now what we need to do is create an environmental configuration file.
This is where you will be placing your own personal API and secret keys.
This is deliberately blocked from this codebase GitHub upload in case someone wants to upload their tweaks to it to their own repo then we cannot risk this file being exposed.
So, first of all, make sure your terminal is still in the git-shared directory and then run the following command.
touch .env.localThat command has simply created an empty file names .env.local.
You should see it in the left hand sidebar. If you select it, you will see an empty file editor open up.
In there you need to copy and paste the content below into it. Then SAVE that file.
Afterward we will run through getting the details you need to fill in the elements from the file.
# --- Supabase --------------------------------------------------------------
# Found in: Supabase Dashboard → Project Settings → API
#
# Grid talks to Supabase ONLY from server-side Next.js API routes, using the
# service-role key. The database is locked down with deny-all RLS policies, so
# the service-role key is what makes the app work. KEEP IT SECRET — it must
# never be exposed to the browser. There is no NEXT_PUBLIC_ prefix on purpose.
SUPABASE_URL=https://YOUR-PROJECT-REF.supabase.co
# Use the SECRET key (starts with `sb_secret_...`) from Supabase Dashboard →
# Project Settings → API Keys. This replaces the legacy `service_role` JWT.
# It bypasses RLS and is what the server-side code needs to read/write data.
SUPABASE_SECRET_KEY=sb_secret_XXXXXXXXXXXXXXXXXXXXXX
# --- DataForSEO -----------------------------------------------------------
# Sign up at https://dataforseo.com/ and find these under
# Dashboard → API Access. These power the Google Maps SERP scans.
# KEEP THESE SECRET – they are server-side only.
DATAFORSEO_LOGIN=your-dataforseo-email@example.com
DATAFORSEO_PASSWORD=your-dataforseo-api-password
# --- Google Maps JavaScript API -------------------------------------------
# Create a key in Google Cloud Console → APIs & Services → Credentials.
# Enable: Maps JavaScript API + Places API.
# Restrict the key to your domain(s) before going live.
NEXT_PUBLIC_GOOGLE_MAPS_API_KEY=AIzaSy-your-google-maps-api-key
If you have played with code before you should be able to get those keys, I wont bore you all with screenshots to show you how to get them all. However if you are not sure, I show you how to get those keys in the video tutorial which will show everything from start to finish.
Anyway, lets assume you have filled in all of the keys in the in env file, the software is now ready to run.
In your terminal (again make sure you are still in the grid-shared directory and type the following:
npm run devNow, this is the moment of truth. The software should start up, you IDE is now essentially running as your server which hosts the software.
If you have followed the instructions, your terminal should be showing the code below which means you can access your Grid Rank Tracker at the url: http://localhost:3000
This is what you should be seeing in your terminal:
richvoller@Mac grid-shared % npm run dev
> grid@0.1.0 dev
> rm -rf .next && next dev
▲ Next.js 16.1.6 (Turbopack)
- Local: http://localhost:3000
- Network: http://192.168.3.1:3000
- Environments: .env.local
✓ Starting...
✓ Ready in 685ms
Now, your own brand spanking new copy of the grid rank tracker is running on your computer.
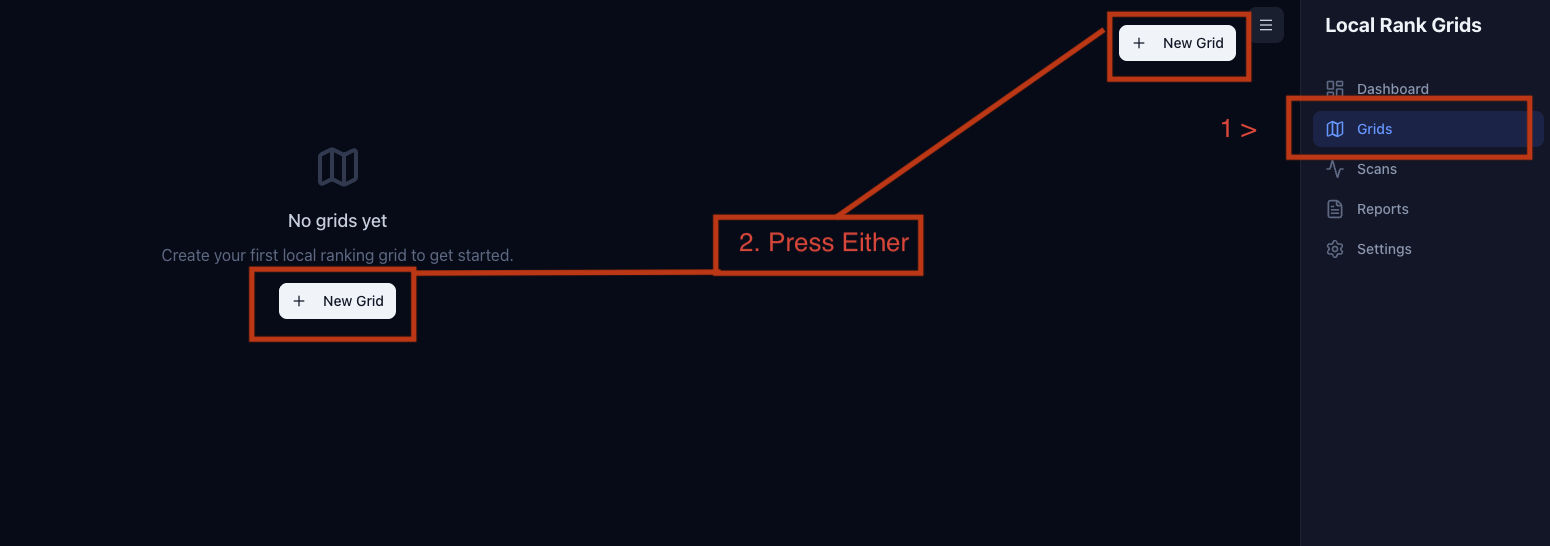
Now, when you visit https://localhost:3000 you should be taken to the main dashboard page.
There are some hangover stats in there but ignore those. For now, you just need to select 'Grids' which will take you to the empty grid dashboard, then select 'new grid', as shown below. This dashboard will show all of your grids and their corresponding data.
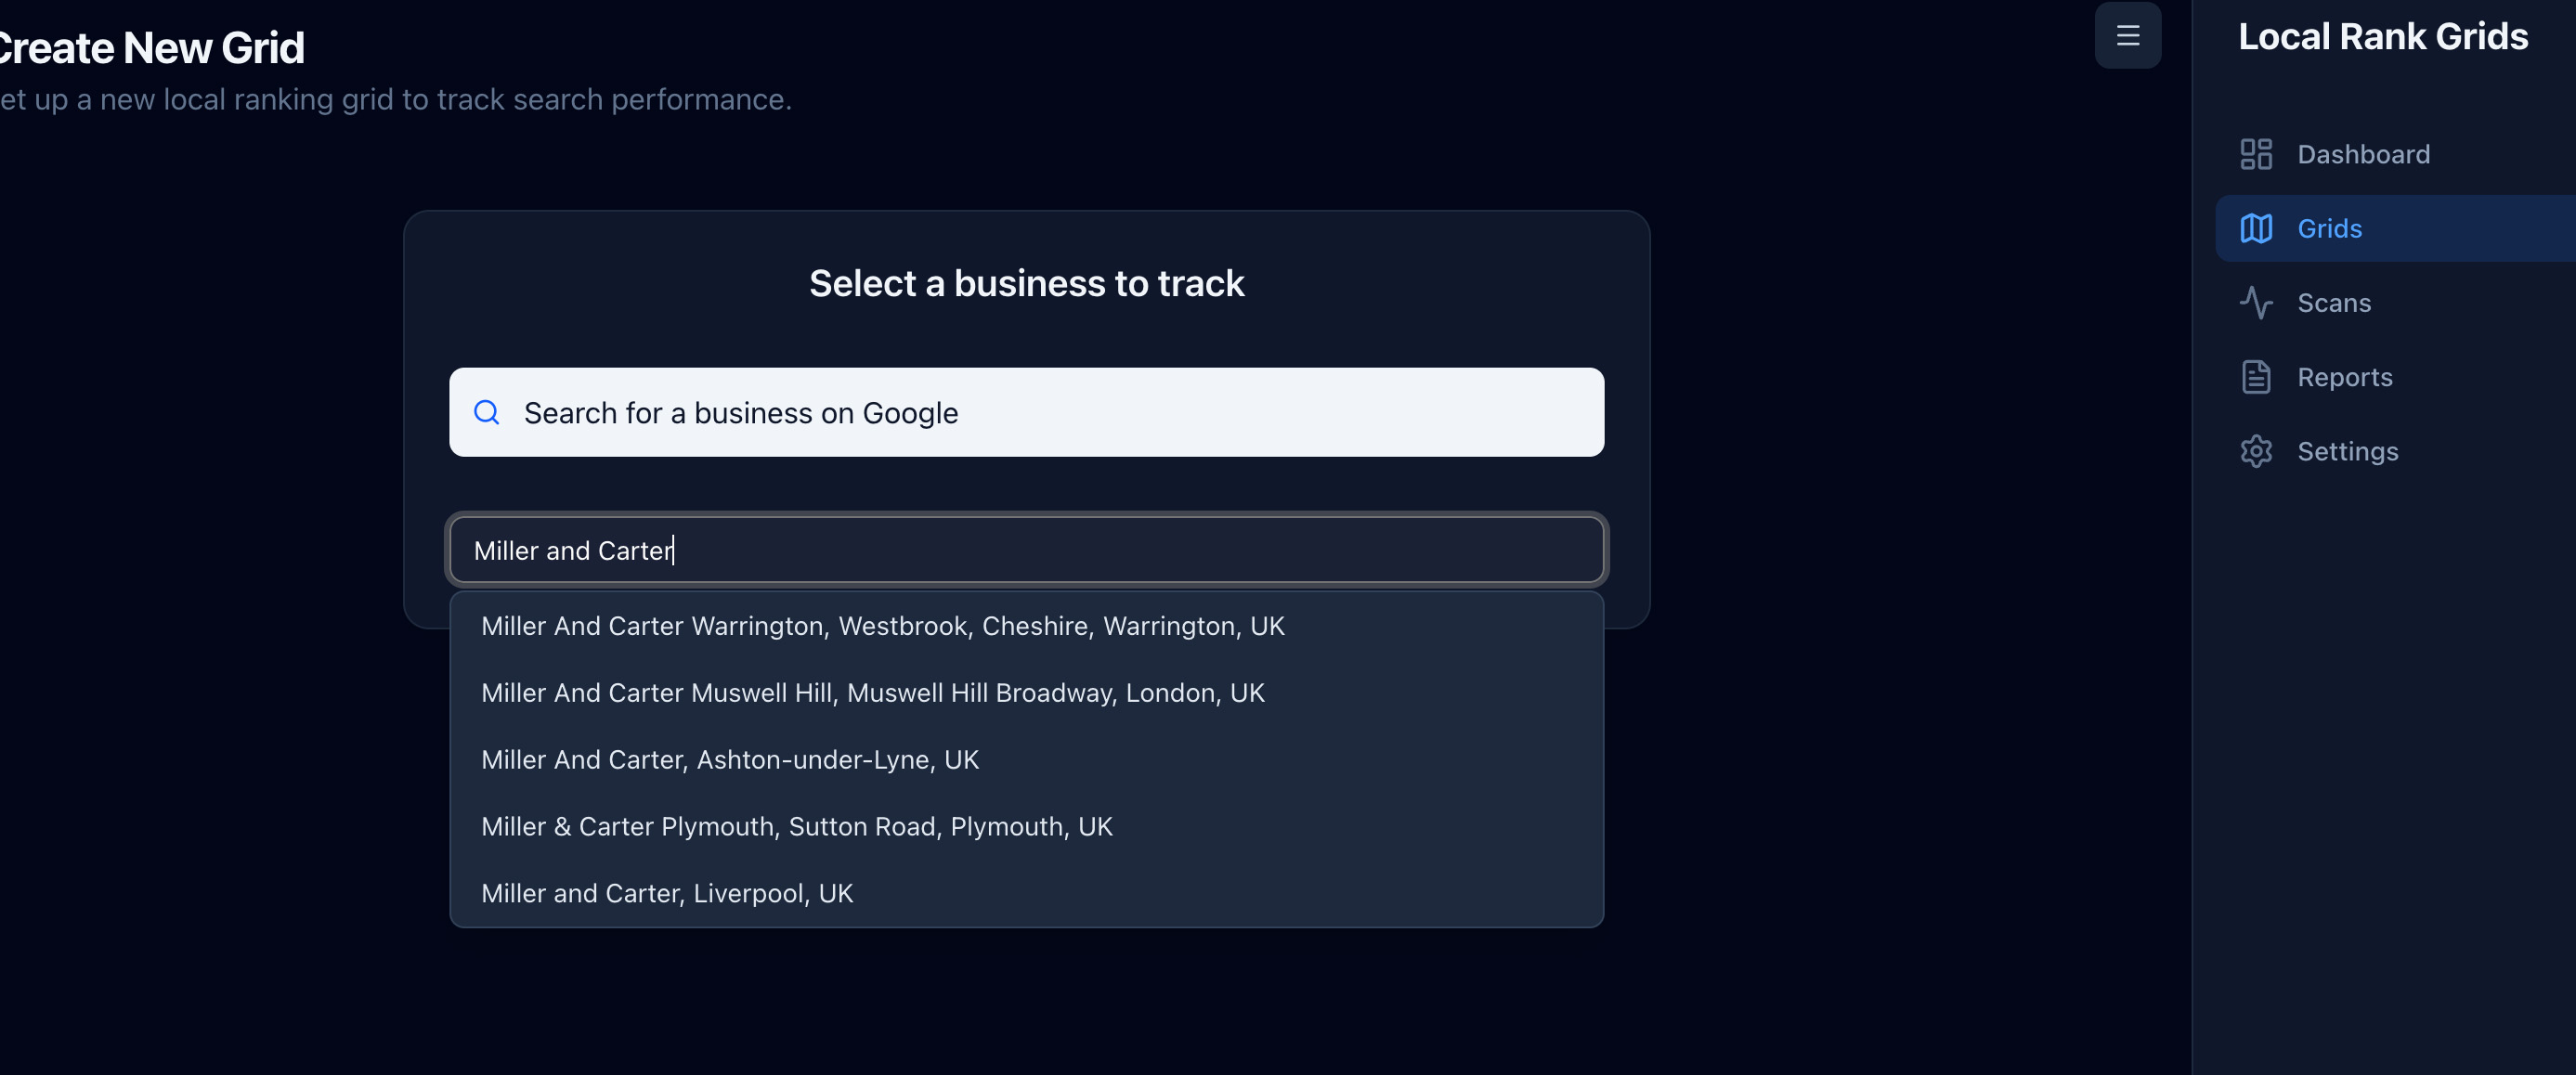
The first thing you will need to do when you get the next screen is find your business on Google. Simply start to type your business name and pulls from the Google Maps API to grab your business data.
In this case i am going to select Miller and Carter Portsmouth, a steak house that has recently opened.
On this next part of the setup flow, you will see a map with an orange dot. That dot should be the exact location of your business as taken from Google Maps, this serves as the anchor point for your grid. If it is off, then you need to double check your Google Business listing address.
The blue points with the ? in them that surround the anchor point are where the tool will check the rankings from.
The default grid size for this tool is 5x5 and with a 1km distance (north, south, east and west) between them. This is customisable with the sliders that you see in the left hand side bar.
You can also set whether you want the scan to run, as a one off, daily, weekly, monthly etc.
One important point to note, you can select the points you do not want to check.
From the image below you can see there are several grey dots.
These are where I have manually de-selected those points.
As in this case, the reason I have deselected them is that they are over water and marshland so really no point in tracking them.
Now, scroll to the bottom where you can put your keywords to track. It will automatically add your business name. To be honest I usually remove this as if you do not rank for your own business name in your exact location then you likely have a real problem.
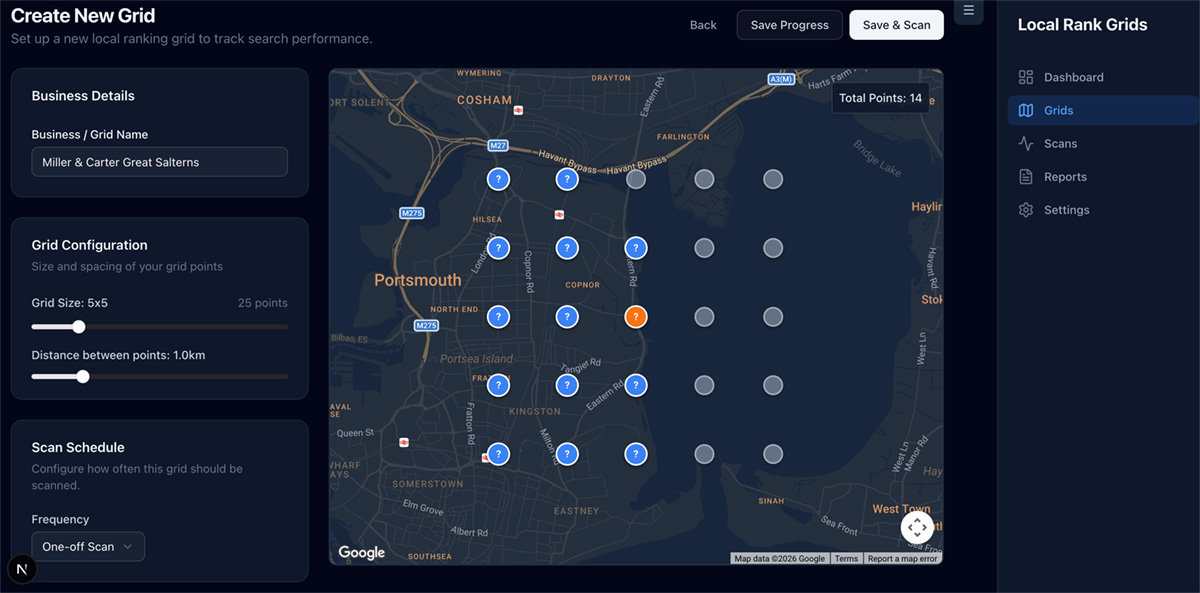
At this point, you can save progress or press save and scan and it will start to do its scans.
Important Notes About Timings
At this point you need to leave the tool to do its thing.
It is set to use the Standard Queue in DataForSEO. This means that while they will still likely only take a few minutes, the software will wait for the results for up to 45 minutes before declaring the SERP fetch "failed".
After about a minute your terminal will show something like this:

As you can see from the terminal screenshot, it records how many of the tasks have completed, any failures and how many are still pending.
The tool will poll the API around every 30 seconds to check if the results have completed. Once they have, it will be clear in terminal that the run is complete.
Simply reload your grid and you will see something like this:
So, now that the grids are in. On the left you will see the rankings for you and all of your competitors in the left hand table. Like this:
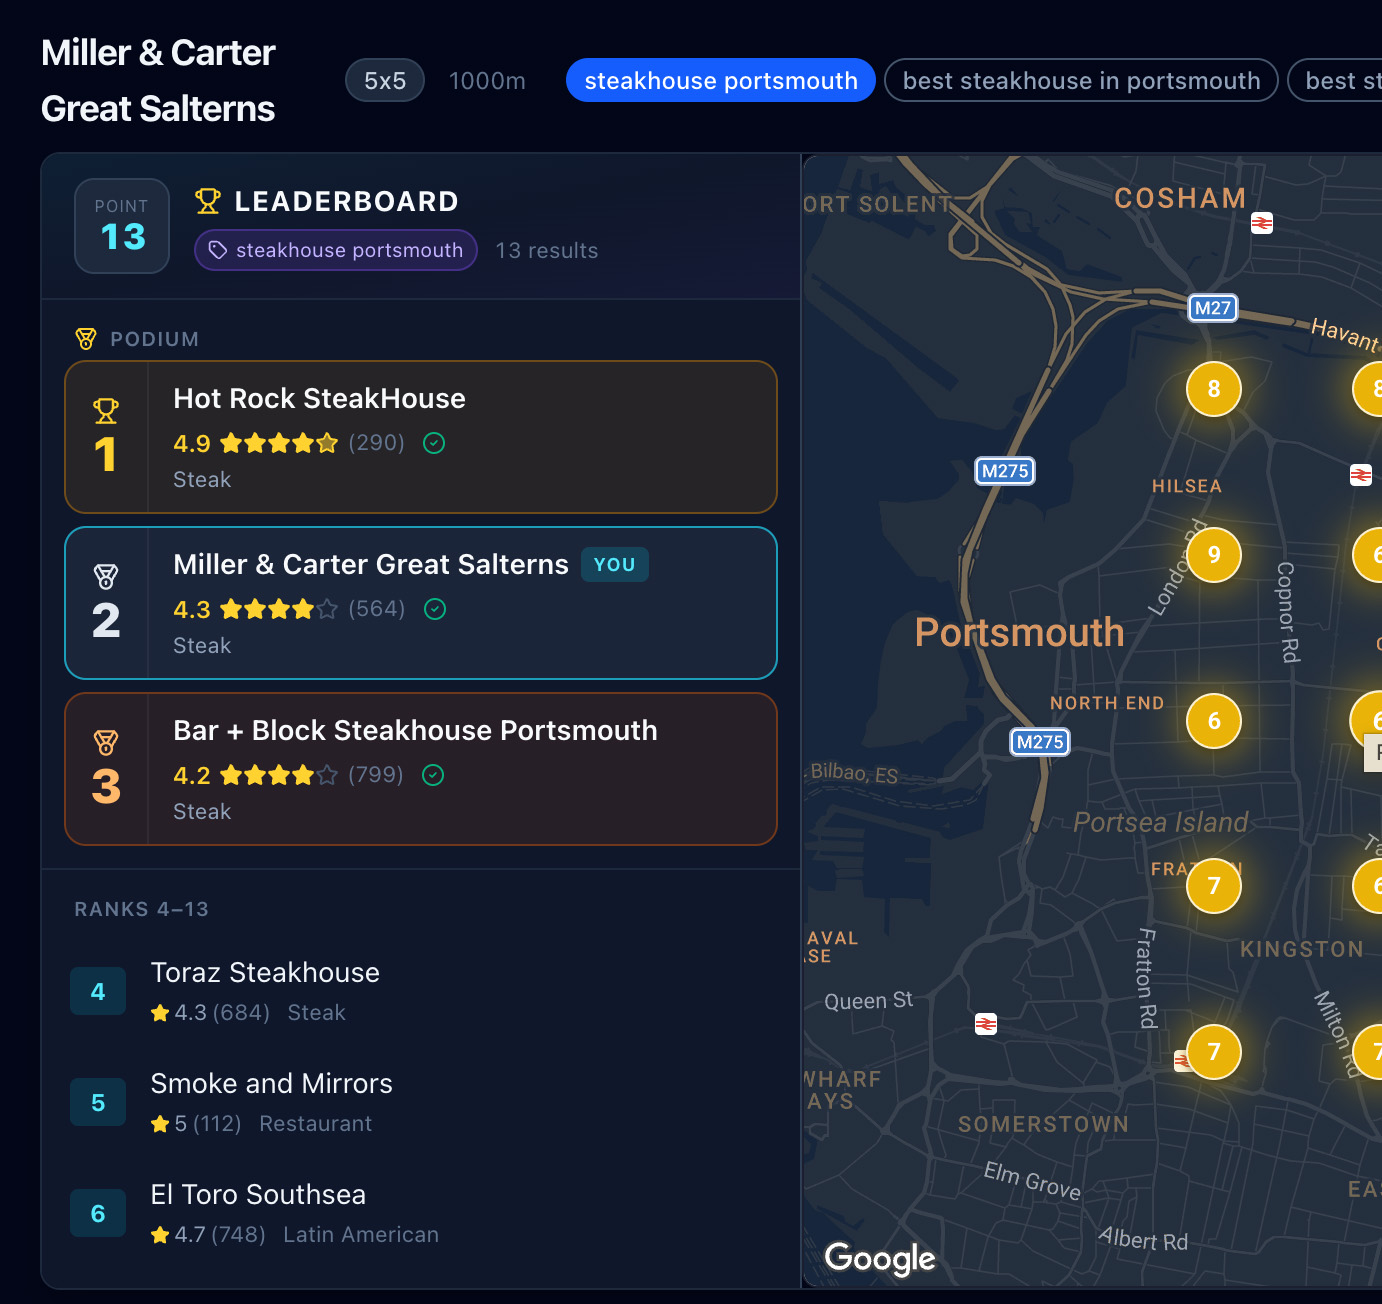
This tool can give you a high level overview of the competitors you are up against as well as expanded information about how their profile stack up.
Elements such as categories, reviews, image counts, opening hours etc.
Note, categories should be double checked as even though these come straight via the API from Google we do see some ambiguity with reality on which ones show.
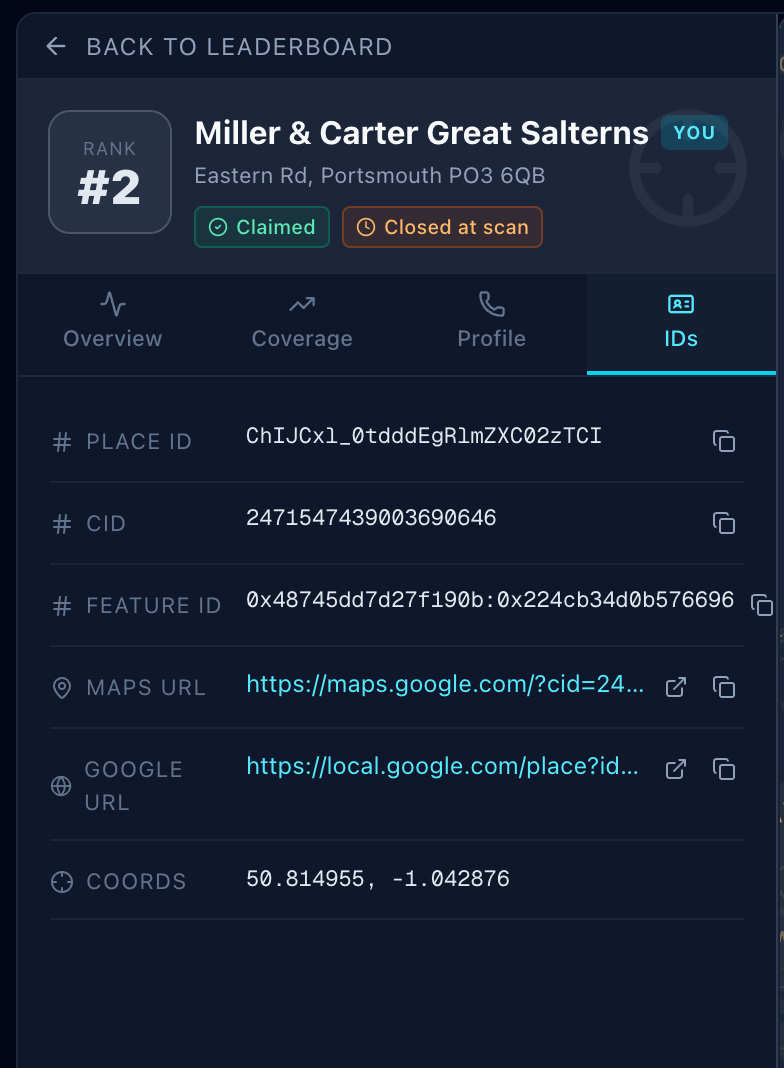
As you can see from the screenshot below. There are 4 selectable tabs where you can choose what elements to inspect.
So that's it. A free grid rank tracker just for you.
Of course, you have the codebase for it. If you want to make tweaks, let Claude Code or Codex make tweaks to your taste.
As I mentioned at the beginning, the reason this was built is because it fits in directly with our in house systems allowing us to eliminate copy pasting of data between 1 platform and reporting dashboards. But the principle behind it is super simple:
Give it points to check > fire those to DataForSEO API > Save results to Database > Display.
Grid rank trackers are helpful to uncover your performance in the local map pack.
Many companies put all their effort into appearing well in the organic SERP's but forget what is probably the most important factor for local businesses which is true local visibility.
Make sure your agency is focusing on the whole picture, not just tunnel vision on page's visibility on the primary website.
Again, hopefully someone will find this useful.
Est. reading time
9 minutes
Summarise with AI