MCP Server For SEO Analysis

Written by
Rich Voller
Senior SEO specialist and digital marketing strategist with over 20 years’ experience helping businesses grow through search. Rich focuses on bridging the gap between AI, data, and real-world SEO performance. Building practical systems, tools, and frameworks that turn complex data into clear, actionable insights.
The Problem with How Most Agencies Are Using AI Right Now
SEO agencies and freelancers are used to spending a small fortune on tools, usually on a monthly or annual subscription. For the most part, they are a necessary evil. They are tools of the trade much like a wrench is to a mechanic. Tools for backlink analysis, keyword research, and analysing the competition are worth every penny.
However, the most valuable data is data you already own. How you access and use that data is changing.
Here is a situation that might feel uncomfortably familiar.
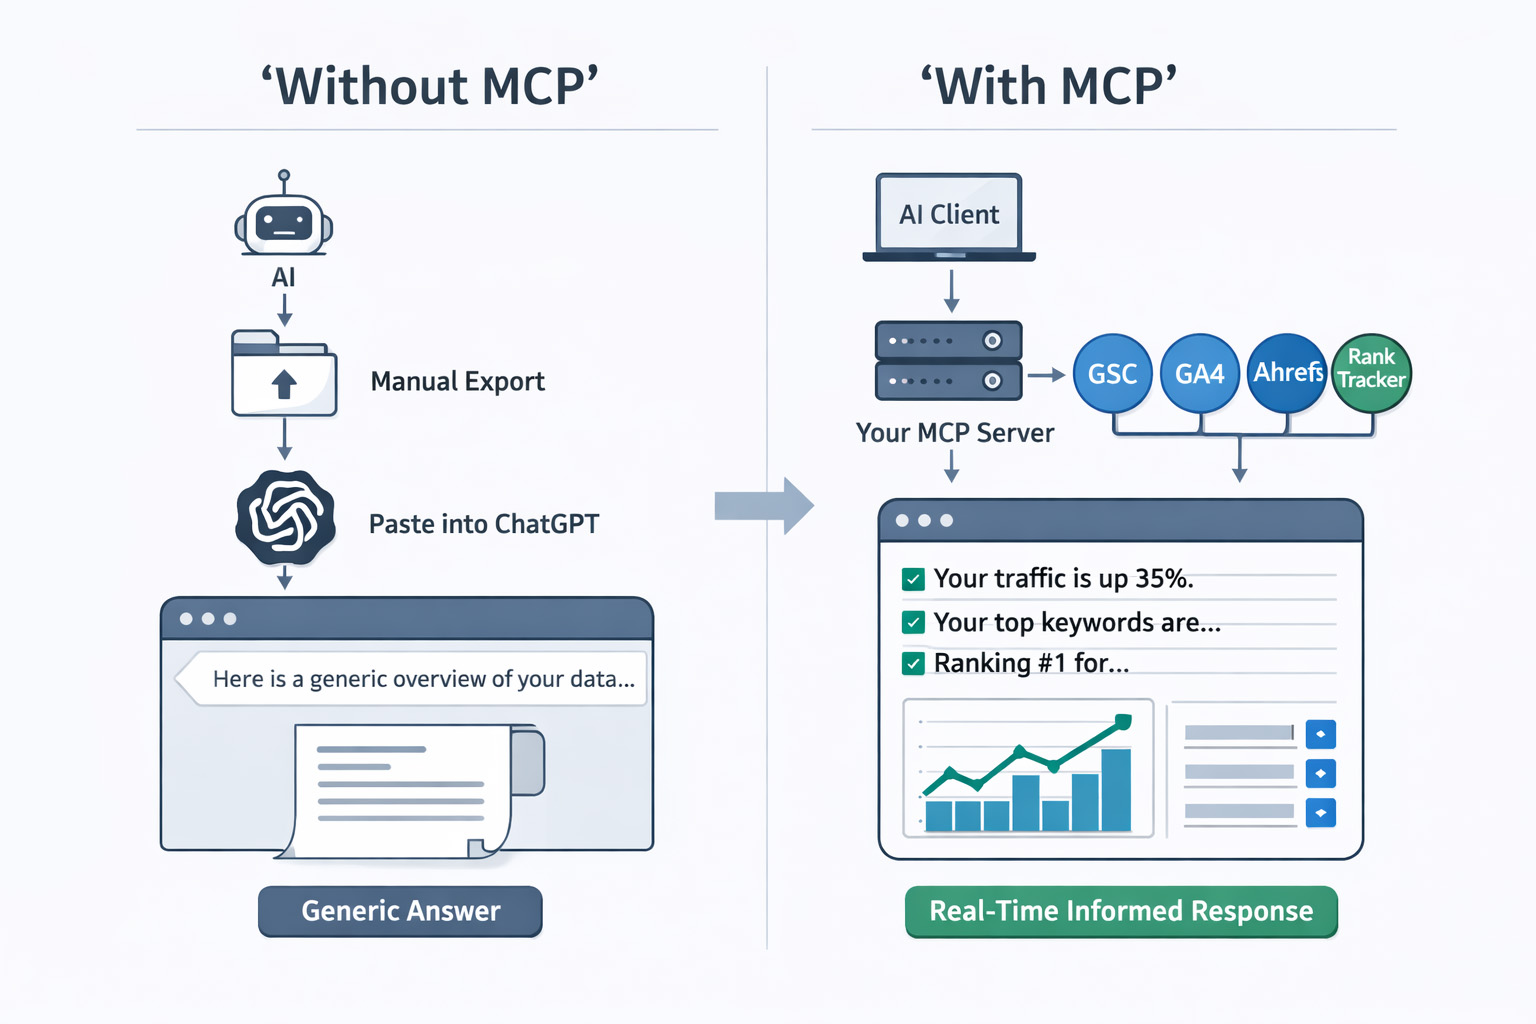
A client emails to say their traffic has dropped. You open your LLM of choice, paste in a snippet of GSC data you exported manually, ask it to help you diagnose the problem, and get back a response that is technically coherent but contextually shallow, largely because the your AI has no idea who the client is, what their history looks like, what their competitors are doing, or what you have (or haven’t) already tried.
Then you do the same thing with Ahrefs / SEMrush data. Then GA4 data. Then you compile everything manually and write the response yourself anyway.
This is not AI-assisted SEO. This is copy-pasting data into a chatbot. There is a better way.
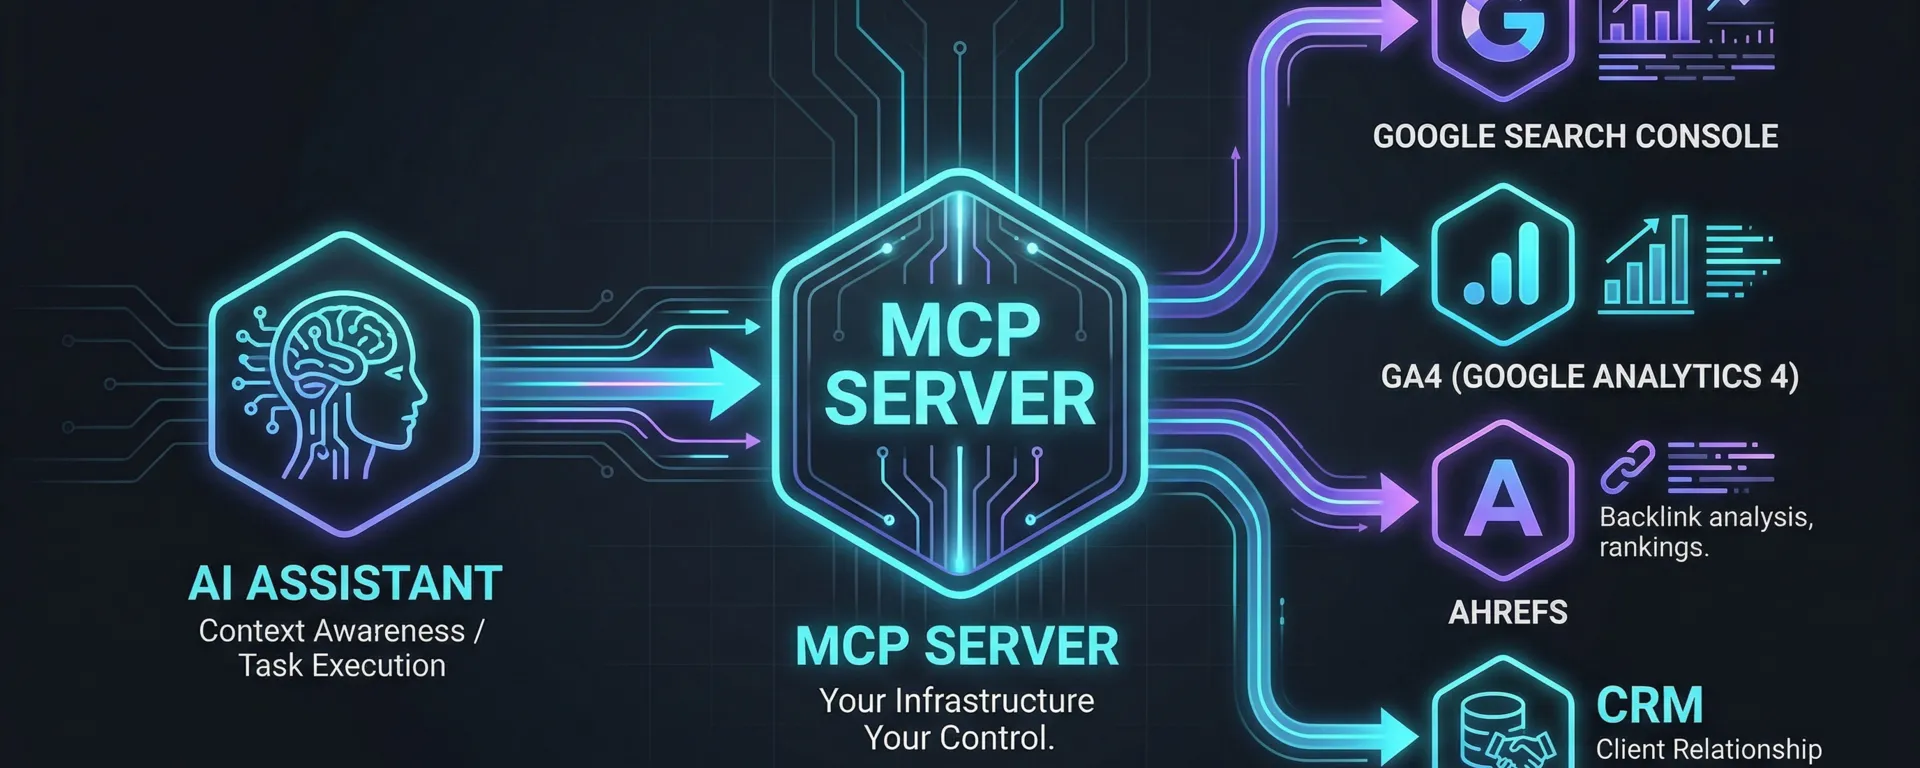
The shift that separates genuinely AI-native processes from everyone else is infrastructure. Specifically: a private, self-hosted MCP server. This is a layer that sits between your AI assistant and every tool you already pay for, giving the AI programmatic access to your data without any manual exporting or third-party vendor involvement. Your credentials and data fetching stay on your infrastructure. And you build the whole thing yourself.
This post will show you exactly what that means, why it matters for client confidentiality, and what you can build with it. I will walk through how to set one up from scratch and we have put together a free barebones MCP server download so you can get running quickly, with your own API keys, in under 30 minutes. You only need to set this up once and then call upon it as you need it. We will also introduce the role Obsidian plays as a persistent knowledge layer, which we will cover in depth in the another post.
What Is Model Context Protocol - and Why Should SEO Professionals Care?
Model Context Protocol (MCP) is an open standard developed by Anthropic, published in late 2024. Its purpose is straightforward: it provides a universal way for AI models to communicate with external tools, data sources, and services.
Before MCP, connecting an AI to your GSC data meant writing custom code, API calls, authentication handling, response parsing, prompt formatting. Every tool needed its own bespoke integration. Multiply that across GSC, GA4, Ahrefs / SEMrush, your rank tracker, and even your CRM, and you end up with either a significant engineering project or, more likely, no integration at all.
MCP standardises that connection layer. Instead of building individual bridges between your AI and each tool, you build one MCP server. Your AI client connects to that server, and through it gets access to every tool you have wired in. One protocol. One connection point. Your entire tool stack, queryable in natural language.
The key difference is this:
without MCP, your AI is working from a snapshot of data you pasted in manually. With your own MCP server, it is making programmatic API calls to your tools, reasoning across current data, and returning answers that are grounded in what is actually in your accounts right now — rather than a week-old export. A quick note on "real-time": the data you get back is only as fresh as the source allows. GSC, for example, runs on a 2–3 day reporting lag, so you are getting the most recent available data, not a live feed. For most agency workflows, that distinction does not matter. It is still a million miles ahead of a manually exported spreadsheet.
In plain language: your MCP server is the intelligence layer between your AI and your tools. You build it. You control it. The AI calls it whenever it needs data, and it fetches that data directly from your APIs.
MCP Architecture: How It Actually Works
Understanding MCP requires understanding three terms. This is also worth getting right because it clarifies why self-hosting is the correct approach for agency work.
The critical point is in that final row. Your MCP server is not a third-party service you subscribe to. It is your own code that you own and run, making API calls to the tools you already have credentials for. The AI never touches your data directly — it sends requests to your MCP server, which calls the relevant API, retrieves the data, and passes it back.
DataForSEO, Ahrefs, Google Search Console — these are not MCP servers you connect to (although many have their own). They are APIs your MCP server calls on your behalf. The distinction matters both architecturally and for data privacy purposes.
Why Self-Host? The Case for Private MCP Infrastructure
There are two approaches people take with MCP and AI tools. Some agencies connect their AI directly to vendor-provided MCP servers. Some of these run locally on your own machine, but others route your queries through the vendor's cloud infrastructure — and in those cases you are operating under their data handling policies rather than your own. Others build their own server and keep everything in-house.
For an SEO agency or freelancer handling client data, self-hosting is not just preferable it is the responsible choice.
The Data Privacy Problem Many Agencies and Freelancers Are Ignoring Or Misunderstand
When you connect your AI to a third-party tool's infrastructure whether that is their MCP server, their API with data logging enabled, or a hosted AI integration, you are operating under that vendor's terms and data handling policies. In many cases, particularly via API access, your data protections are weaker than you might assume. Some providers use inputs to improve their models. Others retain data indefinitely. Very few offer the data processing agreements that would satisfy GDPR requirements for sensitive client sectors.
But when your AI queries data through your own MCP server, the flow is entirely within your control:
Your own MCP server gives you the control to address all four — but only if you build it that way. You define the permission scope for each tool. You manage token rotation. You run each client's data queries through isolated contexts. You maintain a full audit log of every API call made. The infrastructure makes all of this possible; it does not do it automatically. For agencies with clients in healthcare, finance, legal, or any regulated sector, this is a compliance requirement, not a nice-to-have. And for every other agency, it is a client trust argument that will only become more relevant as AI use becomes more visible.
What to Connect: Wiring Your Tool Stack Into Your MCP Server
Your MCP server is only as useful as the APIs you connect to it. Each connection is a tool definition inside your server: a named function, a description the AI uses to understand when to call it, and the code that makes the API request and returns the result.
The good news is that every major SEO tool already has a well-documented API. You are not waiting for anyone to build integrations. You are writing the wrappers yourself — or, as you will see in the tutorial section, starting from our pre-built scaffold and adding your API keys.
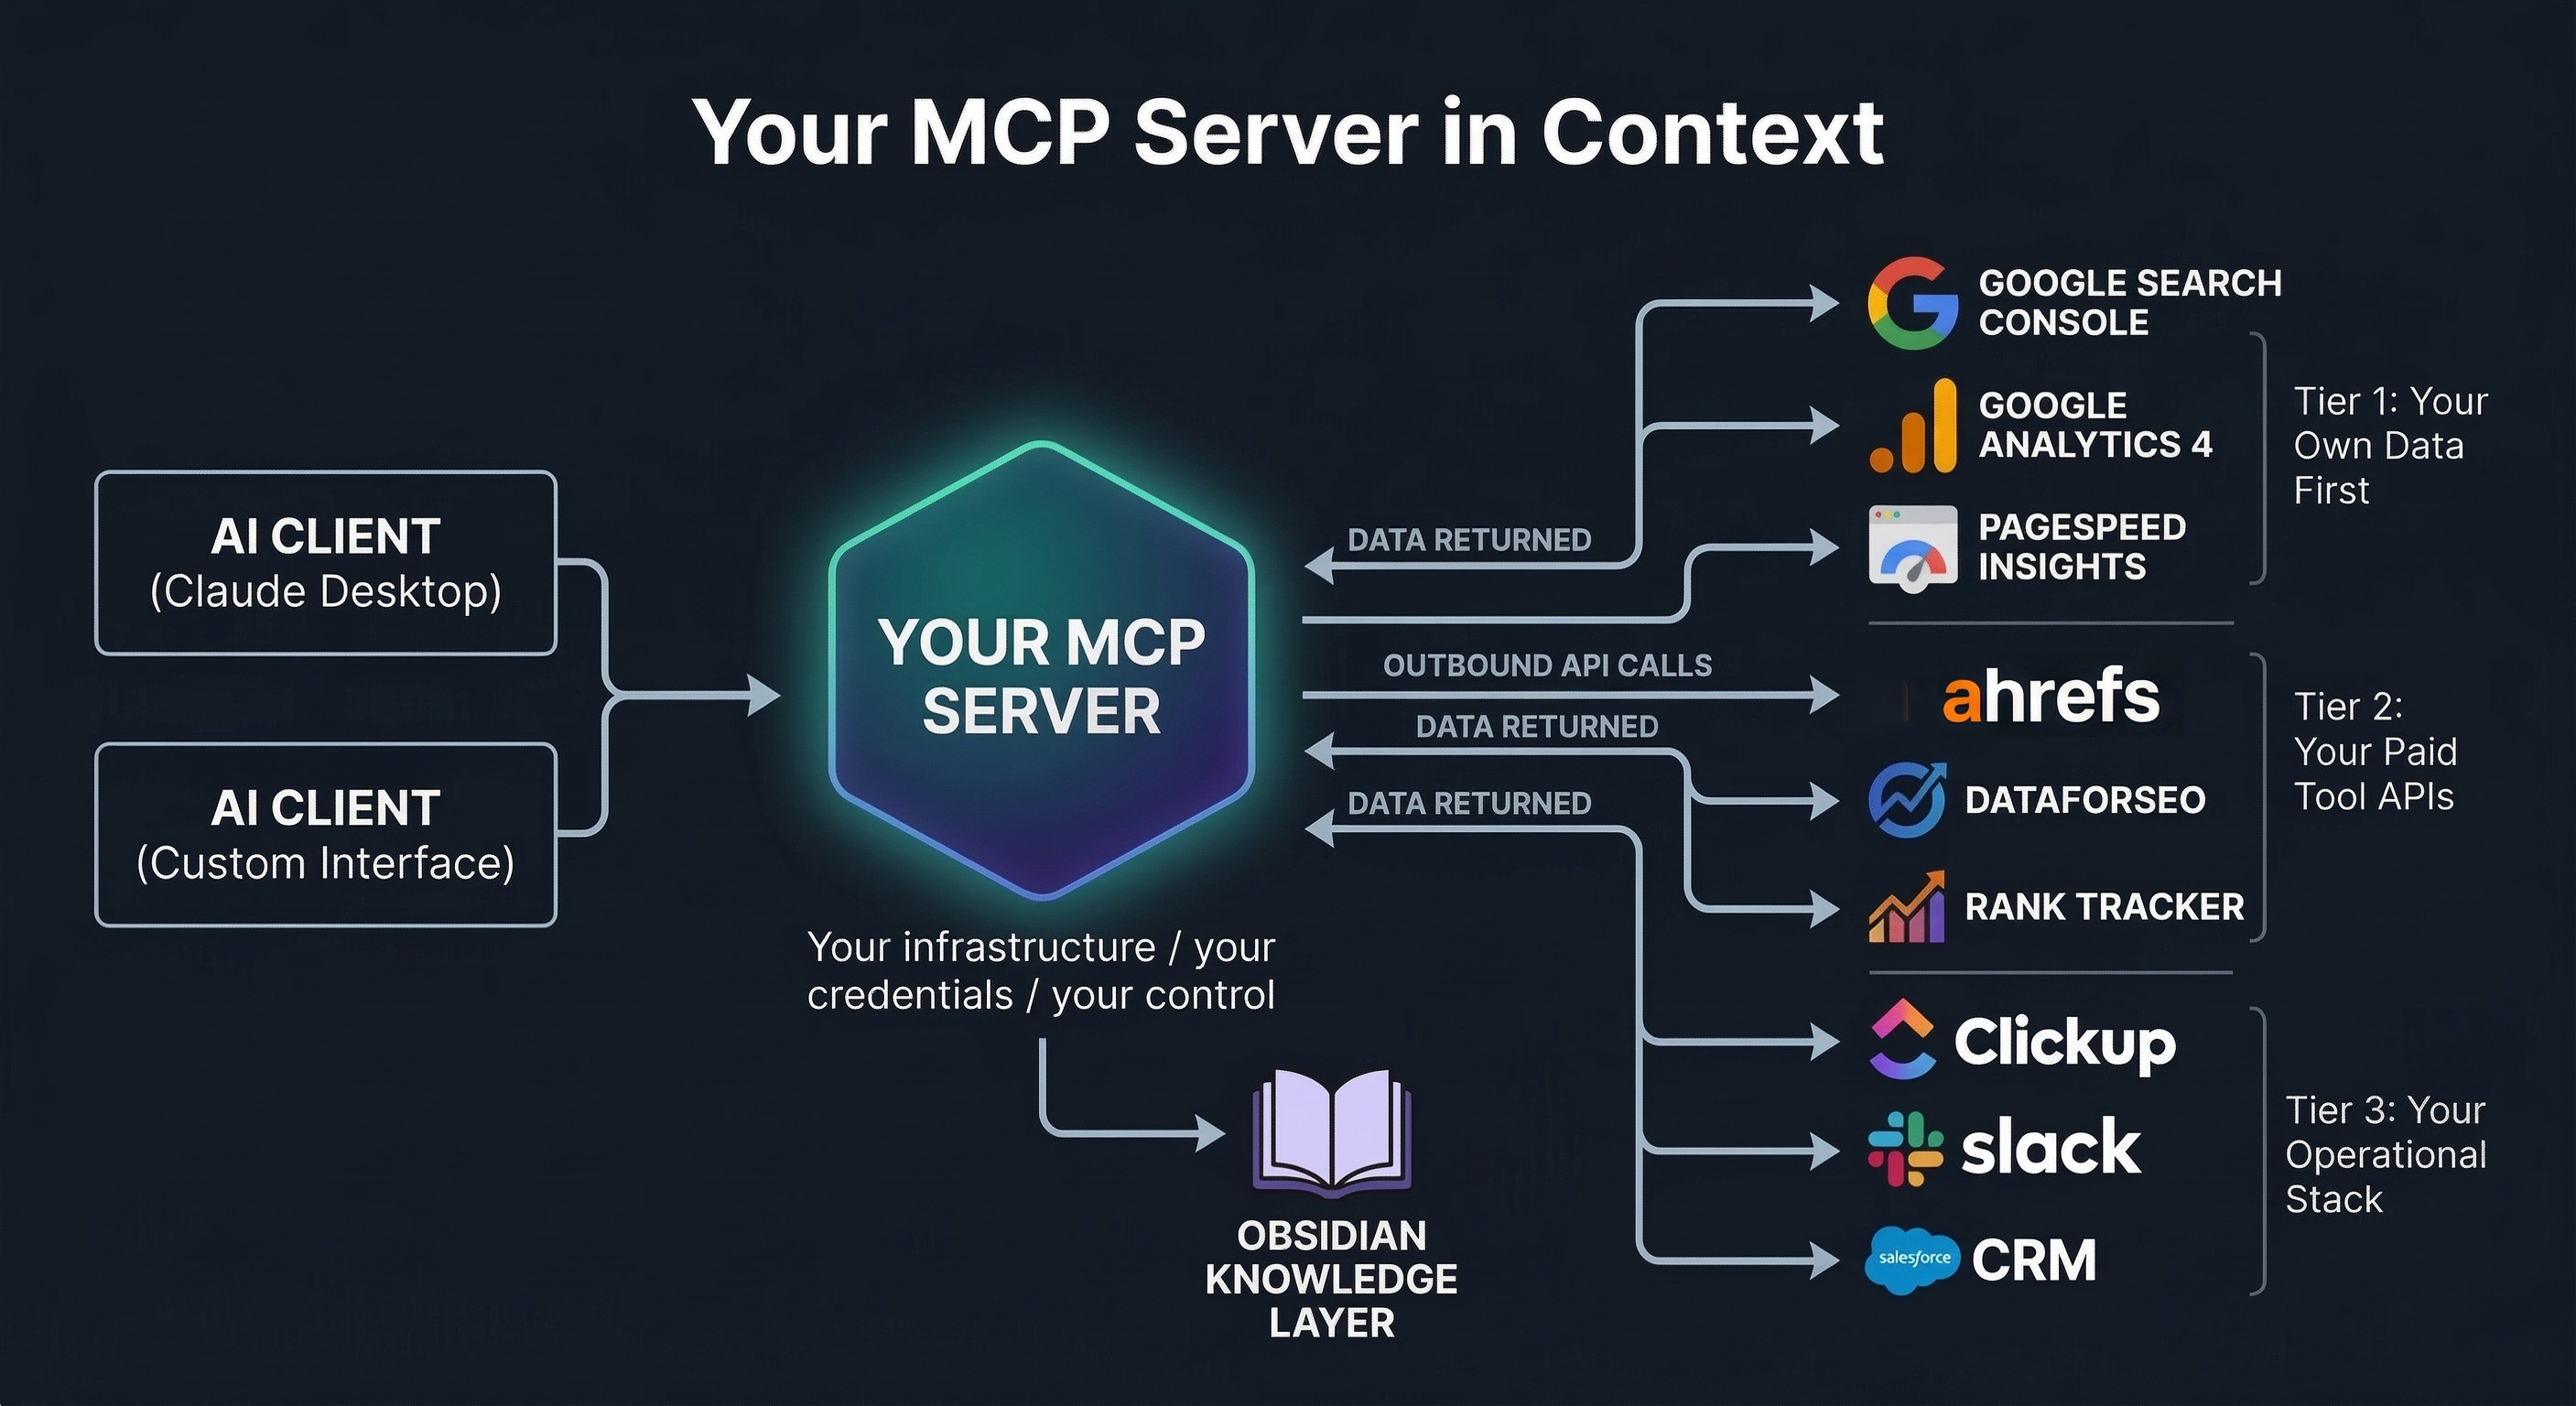
Tier 1: Your Own Data First
These are the integrations that deliver the most immediate value because they give your AI access to data that is uniquely yours, performance history no tool vendor can replicate.
• Google Search Console API: Impressions, clicks, CTR, average position, page and query-level data. This is the most important connection. Your GSC data is client-specific, historically rich, and not available anywhere else. Query it via the Google Search Console API using OAuth credentials.
• GA4 API: Session data, engagement metrics, conversion performance, and page-level behaviour. Combined with GSC data in the same query context, your AI can correlate traffic changes with behaviour changes in a way no dashboard currently makes easy.
• Google PageSpeed Insights API: Core Web Vitals and performance scores pulled programmatically for any URL. Free to use, no subscription required.
Tier 2: Your Paid Tool APIs
Most tools you are already paying will have an API. These are not MCP servers you connect to, they are APIs your MCP server calls. The distinction is important: you are in control of what gets requested, how credentials are stored, and how data is handled after retrieval.
• Ahrefs / SEMrush API: Keywords, backlinks, organic traffic estimates, competitor data, content explorer (ahrefs). Connect once in your MCP server and query it in natural language alongside your GSC data.
• DataForSEO API: SERP data, keyword difficulty, search volume, competitor SERP analysis, and AI Overview detection. Particularly useful for cross-referencing your ranking positions against live SERP feature data.
• Screaming Frog: Screaming Frog is not a native cloud API, but it has more flexibility than it first appears. It supports headless mode via CLI, which means you can run it on a cloud VPS (AWS, Google Cloud, etc.) without a graphical interface and wrap it in a script to create an on-demand crawl tool for your MCP server. For most agencies the simpler approach is to build an MCP tool that reads and reasons over exported crawl data files — but if you want a fully automated setup, the headless VPS route is a real option. Combined with GSC data in the same context, an AI-driven technical audit becomes significantly more powerful.
• Rank tracker: most rank tracking tools (SERPWatcher, Nightwatch, AccuRanker etc.) provide APIs, or if you are tight like me then the likes of SERProbot starts at $4.99 per month and you can query your campaigns via API. Connect yours to give your AI access to ranking trend data without any manual exports. Be warned though, many of these tools claim to check the top 100 results for a keyword, however since the &num=100 bloodbath, this doesn’t happen.
If you absolutely must check the top 100 results, my recommendation is simply build your own. Windsurf, Cursor or Google Antigravity make this super simple and using the DataForSEO SERP API, at $0.0006 per request you won’t need to sell a kidney for the data. Store the data on Supabase or something similar and its crazy easy to ping your own API from there for the data. I have built a rank tracker as a local ranking grid tracker, in time I will strip out our proprietary tweaks and share it as well.
Tier 3: Your Operational Stack
• ClickUp / Asana / Monday: Project management integration lets your AI understand task status, trigger deliverable drafting, and update tasks when work reaches workflow triggers.
• Slack: Push AI-generated alerts, rank flux notifications, and weekly briefings directly into client or internal channels.
• CRM: Client context lives here. An MCP-connected CRM means your AI always knows the client's sector, competitors, agreed KPIs, and contract status before generating any output.
• Obsidian: This free piece of software opens up a whole world of content for your MCP. With a well constructed vault, you can provide huge amount of context to your prompts. There is too much to cover for this in this post so you can expect something for this in the near future.
How to Build Your Own MCP Server from Scratch
This section is a practical walkthrough for SEO professionals who want to move from theory to a working MCP server. You do not need a software development background to follow this but you do need to be comfortable working in a terminal and editing configuration files.
For context, I cannot code at all. However, with the help of tools like Windsurf and Cursor AI and a little technical knowledge, these things can be built very quickly and easily.
Step By Step Setup Guide
A quick note before we start. I am working on a Mac. For those of you who may be working on windows or
Step 1 -- Install Node.js
Node.js is what runs the server. You only need to install it once.
Go to nodejs.org
Download the LTS version (the big green button)
Run the installer and accept all the defaults
To check it worked, open your terminal and type:
node --versionYou should see something like v18.x.x or higher. If you see an error, restart your terminal and try again.
What is a terminal?
A Terminal is a text based interface between you the user and your computers operating system.
On Mac's it's literally called 'terminal' and on windows its command prompt or powershell.
It can be quite intimidating using commands to run your computer but sooner or later it will become second nature. There are are no commands at all in this tutorial which could potentially damage anything or delete your entire hard drive....hopefully. Anyway:
Mac: Open the app called "Terminal" (search for it in Spotlight with Cmd + Space)
Windows: Open "Command Prompt" or "PowerShell" (search for it in the Start menu)
Step 2 -- Download This Project
Option A -- Download as a ZIP (easiest)
Download From Here
Unzip it to a folder you can find easily, for example:
Mac: /Users/yourname/livewire-mcp-server
Windows: C:\Users\yourname\livewire-mcp-server
Option B -- Clone with Git (if you have Git installed)
If you don't have git installed, let's not worry about that at the moment, its not needed for this to work.
git clone https://github.com/richvoller/livewire-mcp-server.gitStep 3 -- Install Dependencies
Everything in the downloaded codebase is good to go. However you need to install the necessary bits and bobs (technical term) to make it work.
Open your terminal and navigate to the project folder, then run:
cd /Users/yourname/livewire-mcp-server
npm install
Replace /Users/yourname/livewire-mcp-server with the actual path to where you put the folder.
This downloads the small number of packages the server needs. You should see a node_modules folder appear -- that means it worked.
Step 4 -- Create Your Google Cloud Project and API Credentials
This is the longest step, but you only do it once. These credentials are used by Google Search Console, GA4, and PageSpeed Insights.
4a -- Create a Google Cloud Project
- Go to console.cloud.google.com
- Sign in with the Google account that has access to your Search Console and GA4
- Click the project dropdown at the top of the page (it may say "Select a project")
- Click New Project
- Name it something like Livewire MCP Server
- Click Create
- Make sure your new project is selected in the dropdown
4b -- Enable the APIs
You need to turn on three APIs inside your Google Cloud project:
- Go to APIs and Services > Library (use the left-hand menu or search bar)
- Search for and enable each of these (click on each one, then click Enable):
Google Search Console API
Google Analytics Data API (this is the GA4 one -- make sure it says "Data API", not "Analytics API")
PageSpeed Insights API
4c -- Create OAuth 2.0 Credentials (for Search Console and GA4)
- Go to APIs and Services > Credentials
- Click + Create Credentials > OAuth client ID
- If prompted, configure the OAuth consent screen first:
- Choose External (or Internal if you have a Google Workspace)
- Fill in the app name (e.g., Livewire MCP) and your email
- You can skip optional fields -- just click through until it is saved
- Add your own email as a test user
- Go back to Credentials > + Create Credentials > OAuth client ID
- Application type: Web application
- Name: Livewire MCP
- Under Authorised redirect URIs, add: https://developers.google.com/oauthplayground
- Click Create
- A popup will show your Client ID and Client Secret -- copy these somewhere safe (you will need them shortly)
4d -- Generate a Refresh Token
Google uses OAuth tokens that expire every hour. A refresh token lets the server automatically get a new one without you logging in each time.
- Go to developers.google.com/oauthplayground
- Click the gear icon in the top right
- Check "Use your own OAuth credentials"
- Paste in your Client ID and Client Secret from the previous step
- Close the settings panel
- In the left sidebar, find and select these scopes (tick the boxes):
- https://www.googleapis.com/auth/webmasters.readonly (Search Console)
- https://www.googleapis.com/auth/analytics.readonly (GA4)
- Click Authorize APIs
- Sign in with your Google account and grant permission
- Click Exchange authorization code for tokens
- Copy the Refresh Token from the response -- this is the long string you need
Important: Keep your Client ID, Client Secret, and Refresh Token private. Never share them publicly or commit them to Git.
4e -- Create a PageSpeed Insights API Key
- Go back to console.cloud.google.com (make sure your project is selected)
- Go to APIs and Services > Credentials
- Click + Create Credentials > API Key
- Copy the API key that appears
- (This is not necessary but for securities sake, it's recommended) Click Restrict Key, then under API restrictions, select PageSpeed Insights API only -- this limits what the key can do if it ever leaks
Step 5 -- Find Your GA4 Property ID
- Go to analytics.google.com
- Click the gear icon (Admin) in the bottom left
- In the Property column, click Property Settings
- Your Property ID is the number shown at the top (e.g., 123456789)
Step 6 -- Create Your .env File
The .env file is where all your API keys live. It is a plain text file, nothing fancy. In this tutorial we are not using Github / Gitlab as this is locally run, however the .env file contains these highly valuable keys which should never be placed in the public domain. If you do choose to push the codebase to github, make sure that the .env file is placed in the .gitignore file which tells github to give it a damn good ignoring to.
- Open the project folder in VS Code (or your text editor)
- Find the file called .env.example
- Make a copy of it and rename the copy to .env
From your terminal:
cp .env.example .envOr, in VS code (or your choice of IDE) right click, copy and paste and rename the new file to .env.
You could of course just rename .env.example to .env but if you need to refer back to the original, you, well, can't.
Now, open your .env file and replace the placeholders with your actual values.
The file looks like this:
# CORE -- fill all of these in
GSC_CLIENT_ID=your_actual_client_id_here
GSC_CLIENT_SECRET=your_actual_client_secret_here
GSC_REFRESH_TOKEN=your_actual_refresh_token_here
GA4_PROPERTY_ID=your_actual_property_id_here
PAGESPEED_API_KEY=your_actual_pagespeed_api_key_here
# RANK TRACKER -- fill in your SERPRobot API key (leave the URL as-is)
RANK_TRACKER_API_KEY=your_serprobot_api_key_here
RANK_TRACKER_API_BASE_URL=https://www.serprobot.com/api
# OPTIONAL -- remove the # at the start of the line to activate
# SEMRUSH_API_KEY=your_semrush_api_key_here
# AHREFS_API_KEY=your_ahrefs_api_key_here
A point to note, any line with a # is what is known as commented out.
So, if you don't have a SEMrush or ahrefs API key then leave them as they are, if you do, then remove the # at the beginning and that is it.
If you don't have a rank tracker with an API then simply comment out the Rank Tracker rows by adding in a # followed by a space at the beginning of those rows.
Now, remember to save your file changes otherwise they will not take effect.
Step 7 -- Connect to Claude Desktop
Claude Desktop needs to know where your server is. You do this by editing a small configuration file.
Find the Claude config file
Mac: ~/Library/Application Support/Claude/claude_desktop_config.json
Windows: %APPDATA%\Claude\claude_desktop_config.json
Mac tip: The Library folder is hidden by default. In Finder, click Go in the menu bar, hold the Option key, and you will see "Library" appear. Navigate to Application Support > Claude.
Windows tip: Press Win + R, type %APPDATA%\Claude and press Enter to go straight there.
If the file does not exist yet, create it.
Edit the config file
Open claude_desktop_config.json in VS Code (or any text editor) and set its contents to:
{ "mcpServers": { "livewire-seo": { "command": "node", "args": [ "/FULL/PATH/TO/livewire-mcp-server/src/server.js" ] } }
}
Replace /FULL/PATH/TO/livewire-mcp-server/src/server.js with the real path to the server.js file on your computer. For example:
Mac: "/Users/sarah/livewire-mcp-server/src/server.js"
Windows: "C:\\Users\\sarah\\livewire-mcp-server\\src\\server.js"
Windows users: Use double backslashes (\\) in the path, or use forward slashes (/) instead.
How to find the full path: In VS Code, right-click the file src/server.js in the sidebar and select Copy Path. Paste that into the config.
Save your file.
Next, open `src/server.js` and find the line that reads
require('dotenv').config({ path: '/FULL/PATH/TO/livewire-mcp-server/.env' });
Use the same path you used in the Claude config — just stop at the project folder, not `src/server.js`.
So in my case that is :
require('dotenv').config({ path: '/Users/richvoller/Desktop/livewire-mcp-server-main/livewire-mcp-server/.env' });
Once you've made that change, force quit and restart Claude again, then I'll test.
Step 8 -- Restart Claude Desktop and Test
Fully quit Claude Desktop (do not just close the window -- right-click the dock/taskbar icon and quit)
Reopen Claude Desktop
Click the + icon on the chat screen and select connectors, your tool should appear in there like this: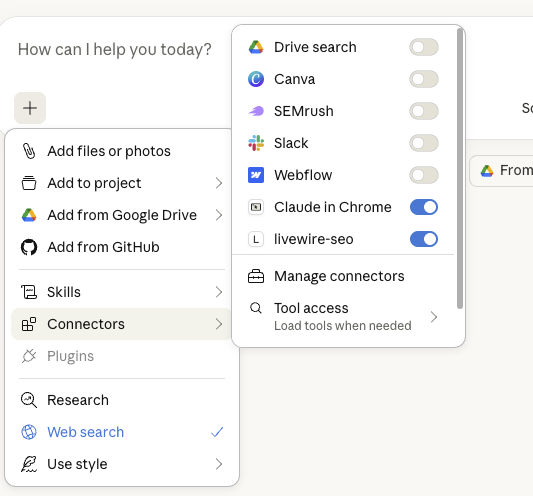
Try these example prompts:
"What are my top 10 pages in Google Search Console for the last 30 days for sc-domain:yoursite.com?"
"Run a PageSpeed test on https://yoursite.com for mobile"
"Show me my GA4 traffic data for property 123456789 for the past 7 days"
"Get my keyword rankings from SERPRobot project 12345"
If you activated SEMrush or Ahrefs, also try:
"Use semrush to tell me all keywords which rank between positions 5 and 10 in the UK for yourwebsite.com"
"What is the Ahrefs domain rating for example.com?"
Thats it! You're up and running. 🎉
Some points to note.
SEMrush and ahrefs API calls, used incorrectly can be very expensive. Be very specific with your prompts. For instance, if you are doing research, especially for country specific searches make sure you tell Claude to focus on that or it will start searching all of the global databases and chew through your API credits like PacMan.
Swapping Your Rank Tracker
If you use a different rank tracking tool (e.g., AccuRanker, Wincher, SERPWatcher, Nightwatch, or any other provider), you can adapt the src/tools/ranktracker.js file to work with their API instead.
You do not need to be a developer to do this. Here is exactly what to do:
- Find your rank tracker provider's API documentation (usually on their website under "API" or "Developers")
- Open the file src/tools/ranktracker.js in VS Code
- Select all the text in the file and copy it
- Open Claude, ChatGPT (or any AI assistant for that matter) and paste in the following prompt:
I have this Node.js file that connects to a rank tracking API.
It is currently configured for SERPRobot. I want to change it
to work with [YOUR PROVIDER NAME] instead.
Here is their API documentation:
[PASTE THE RELEVANT API DOCS OR A LINK]
Here is my current file:
[PASTE THE CONTENTS OF ranktracker.js]
Please rewrite the file to work with [YOUR PROVIDER NAME] while
keeping the same overall structure (toolDefinition and handler
exports). Keep all the comments in the same style.- Copy the rewritten code from ChatGPT
- Paste it back into src/tools/ranktracker.js in VS Code (replacing everything)
- Update the RANK_TRACKER_API_KEY and RANK_TRACKER_API_BASE_URL values in your .env file to match your provider
- Save both files and restart Claude Desktop
Rate Limiting
The server includes a built-in rate limiter to prevent accidental API overuse (which could cost you money on paid APIs). You can configure it in your .env file:
RATE_LIMIT_MAX_REQUESTS=30 # Max requests per 60-second window
RATE_LIMIT_WINDOW_MS=60000 # Window duration in milliseconds (60000 = 60 seconds)
If Claude tells you "Rate limit exceeded", just wait a minute and try again, or increase the RATE_LIMIT_MAX_REQUESTS number.
Troubleshooting
Tools not showing in Claude (in connectors)
- Make sure the path in claude_desktop_config.json is the full absolute path to src/server.js -- not a relative path
- Double-check you saved the config file
- Fully quit Claude Desktop and reopen it (just closing the window is not enough)
- On Windows, make sure you used \\ or / in the path, not single \
"Credentials not configured" error
- Open your .env file and make sure the placeholder values have been replaced with your real credentials
- Make sure the file is named exactly .env (not .env.txt or .env.example)
- The .env file must be in the root of the project folder (same level as package.json)
Google API errors (401 or 403)
- Your refresh token may have expired -- go back to the OAuth Playground and generate a new one
- Make sure all three Google APIs are enabled in your Google Cloud project
- Check that your Google account has access to the Search Console property and GA4 property you are querying
Rate limit errors
- Wait 60 seconds and try again
- Or increase RATE_LIMIT_MAX_REQUESTS in your .env file
Server not starting or general errors
Run the server manually in your terminal to see what is wrong:
node /Users/yourname/livewire-mcp-server/src/server.jsThe error messages will tell you what is missing or broken. Common issues:
- "Cannot find module" -- you forgot to run npm install in Step 3
- "ENOENT .env" -- the .env file does not exist -- go back to Step 6
Still Stuck?
Copy the error message and paste it into ChatGPT or Claude with the question "I am getting this error when running my Node.js MCP server -- what does it mean and how do I fix it?" -- nine times out of ten, you will get a clear answer.
If you need, get in touch. Please note support requests might take a while to reply to, because you know...actual work.
Please note, this tool is offered as is, we offer no guarantees. If you would like to modify it please do. My suggestion would be to add in extra tools like DataForSEO for quick serp results and so many more things.
The world is your oyster.
You don't need to be able to code to expand on this. Really! I cannot code at all. It turns out my mate Claude is quite the coder!
Do what I do, try things out for yourself, Invest in AI coding assistant tools like Windsurf, Cursor or if you are tight, Google Antigravity (free tier is pretty good).
P.S that is my referral link to Windsurf (my IDE of choice), you of course do not need to use it, but I chew through credits and the little credits for referrals all help 😎
Est. reading time
17 minutes
Summarise with AI